Voting in a RetroPGF Round
As a badgeholder in a Drips RetroPGF Round, your role is to evaluate the contributions of applicants and allocate votes to reward the impact you believe they've created. This guide will walk you through the voting process.
To vote in a round, your Ethereum address must have been designated as a badgeholder by the round's administrators.
How to Vote
The voting process is designed to be straightforward, allowing you to focus on making informed decisions. Your progress is saved locally in your browser as you build your ballot, so you can take your time and resume at any point.
1. Access the Round
First, navigate to the public page of the round you wish to vote on. Once the voting phase is active, you will see a prompt to begin. Connect the wallet that has been designated as a badgeholder and sign in. This is a free, gas-less signature to verify your identity.
Once signed in, click the Vote now button in the top-right corner of the page to enter the voting interface.
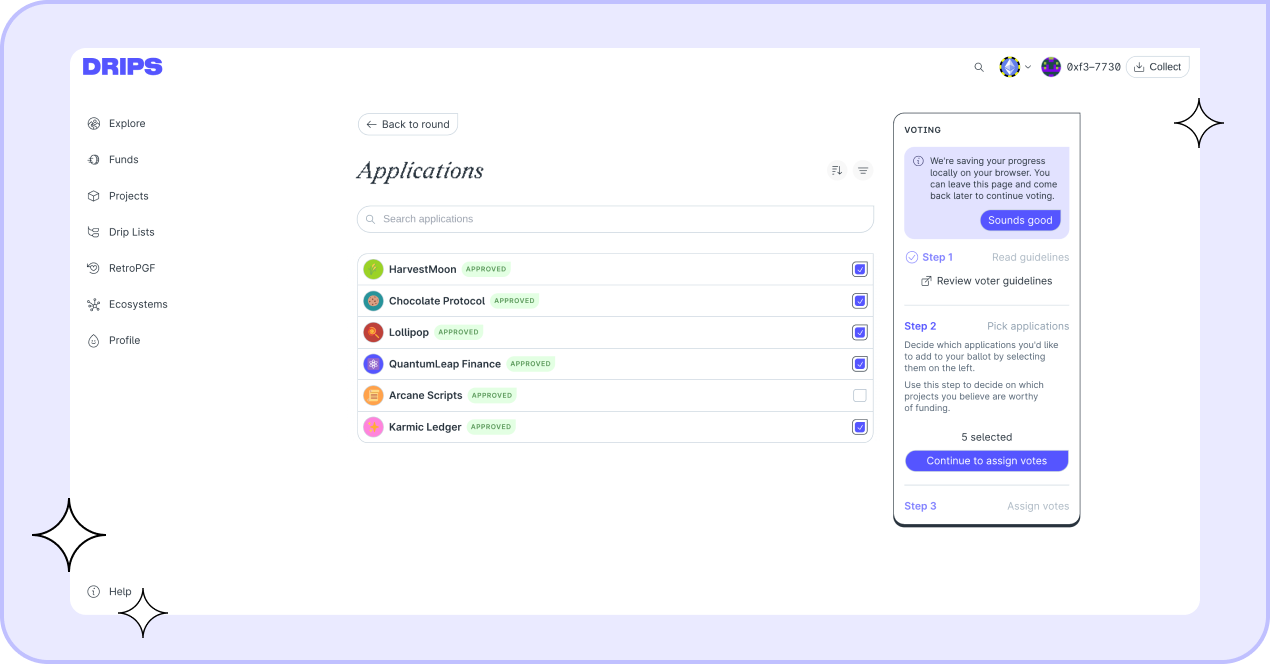
2. Build Your Ballot (Pick Applications)
The first step is to review the list of all accepted applications. You can browse, search, and filter to find the projects you want to support. If the round organizers have provided voting guidelines, you will be prompted to review them here.
You now have two options to proceed:
- Use the Web Interface: Select applications by clicking the checkbox next to their name. This will add them to your personal ballot, which you will configure in the next step.
- Use a Spreadsheet: If you prefer voting in a spreadsheet, skip to the Voting via spreadsheet section below.
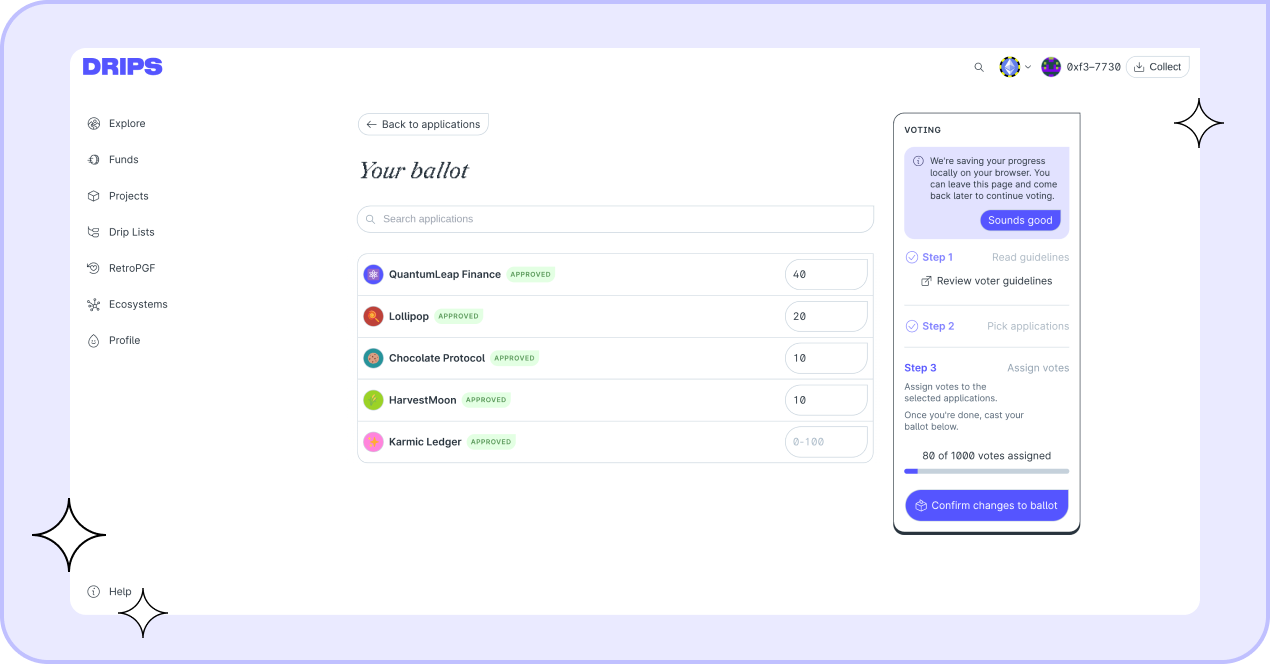
3. Allocate Votes (Web Interface)
If you used the web interface to pick applications, click 'Assign votes' (or 'Step 3' in the voting panel) to proceed to your ballot. Here, you will see only the applications you chose.
Enter the amount of votes you want to assign to each one.
The interface will show you how many votes you have available to allocate in total, and will respect the "maximum votes per project" limit if one was set by the round's admins.
4. Alternative: Voting via Spreadsheet Upload
If you clicked Vote using spreadsheet in Step 2, a new window will open. This method allows you to download all applications, enter your votes in a spreadsheet program (like Excel or Google Sheets), and upload the file to submit your entire ballot at once.
The process is as follows:
- Download the ballot template: Click 'Download CSV' or 'Download XLSX' to get a file of all approved applications, including all data displayed in the Web UI.
- Make your vote allocations: Open the file and find the 'Allocation' column. Enter your votes (as integers, no fractions) for the projects you wish to support. Leave the 'Allocation' cell blank or enter '0' for projects you don't want to vote for.
- Upload your ballot: Save your edited spreadsheet (as CSV or XLSX) and upload it in the 'Upload your result' section. Click 'Submit ballot' to confirm.
5. Submit Your Ballot
If using the web interface: Once you are satisfied with your vote allocation, click the 'Submit ballot' button at the bottom of the page.
If using the spreadsheet upload: Your ballot is submitted when you click 'Submit ballot' in the upload modal.
Your ballot is private. Once submitted, your ballot is recorded securely. Its contents are only visible to the round's administrators to ensure voter privacy.
Editing Your Ballot
You can change your mind at any time while the voting period is still active.
To edit your submission, simply return to the round's page. The button in the top-right will now say Edit your ballot. Clicking it will take you back to the voting interface, which will be pre-filled with your most recent submission (whether it came from the UI or a spreadsheet upload).
From here, you can:
- Edit in the UI: Manually adjust your project selections and vote allocations, then click 'Submit ballot' again.
- Overwrite with a new spreadsheet: Click the Update using spreadsheet button. This will open the upload modal, and submitting a new file will replace your entire existing ballot.
You can edit and resubmit as many times as you like before the voting period ends.